Code With Topic
code with topic
async
并发编程 - Rust 中的异步编程 — Concurrent programming - Asynchronous Programming in Rust
异步编程是一种并发,其高级目标与线程并发(同时做很多事情)相同,但实现方式不同。异步并发和线程并发之间的两大区别是,异步并发完全在程序中进行管理,无需 OS 的帮助,而多任务处理是协作的,而不是抢占式。
并发concurrency:多个任务在一个时间段执行(排序),针对单个cpu,由软件支持(时间片、调度)
并行parallelism:多个任务同时执行,需要多核同时执行多个任务。
并发是组织代码的一种方式,而并行是一种资源。
In threaded systems, each concurrent thread is executed in parallel using as much parallelism as possible. In async systems, there is no strong default: a system may run all tasks in a single thread, it may assign multiple tasks to a single thread and lock that thread to a core (so groups of tasks execute in parallel, but within a group each task executes concurrently, but never in parallel with other tasks within the group), or tasks may be run in parallel with or without limits.
在线程系统中,每个并发线程都使用尽可能多的并行性并行执行。在异步系统中,没有强默认值:系统可以在单个线程中运行所有任务,可以将多个任务分配给单个线程并将该线程锁定到内核(因此任务组并行执行,但在组内每个任务同时执行,但绝不与组内的其他任务并行执行), 或者任务可以并行运行,有限制或没有限制。
async await
术语:
- reactor、event loop、driver:管理IO和计时器事件,并与IO交互
- scheduler
- executor、runtime:结合上面两者,用于运行异步任务,提供api
- future:rust中延迟计算的任务,异步并发的基本单位。关于 Rust 中 futures 的一个重要直觉是它们是惰性对象。要完成任何工作,它们必须由外力(通常是异步运行时)向前驱动。
async:Returns a [Future] instead of blocking the current thread.
await:Suspend execution until the result of a [Future] is ready.
future可以组合成更大的future,async可定义future,await可组合
use tokio::{spawn, time::{sleep, Duration}}; |
例子里hello和world的执行顺序是随机的。spawn将一个future转化为tokio任务执行,做到任务之间的并发
let handle1 = spawn(say_hello()); |
代码与上次类似,但我们不是只调用 spawn,而是保存返回的 JoinHandle 并稍后等待它们。由于我们在退出 main 函数之前等待这些任务完成,因此我们不再需要 main 中的休眠 。
await JoinHandle 会返回一个 Result(这就是为什么我们在上面的例子中使用 let _ = ...,它避免了关于未使用的 Result 的警告)。如果生成的任务成功完成,则任务的结果将采用 Ok 变体。如果任务 panic 或被中止,则结果将是一个包含 JoinError 文档的 Err。如果你没有在项目中通过 abort 使用 cancel,那么解包 ``JoinHandle.await 的结果是一种合理的方法,因为这实际上是将恐慌从被生成的任务传播到生成者。
cancellation
如果要取消一个future:
- 放弃它
- abort中止它
- 通过cancellation
- 通过函数或宏隐式取消
后果:从编写异步代码(在异步函数、块、futures 等中)的角度来看,代码可能会在任何 await 处停止执行(包括宏中的隐藏代码),并且永远不会再次启动。为了使您的代码正确(特别是要确保取消), 无论它是否正常完成,或者是否在任何等待点终止,它都必须正常工作。
block of async
//声明 |
demo
// main.c |
future:一个将来会执行并获得结果的变量,调用poll可以获取结果(如果没到可获取时间,则用轮询获取)
waker:一个轮询中使用的信号量,当轮询到future时,waker作为参数之一传给poll,从而获得future的值
executor:用于管理一批future。单个future用.await驱动,执行器会对所有的future首先poll一次,之后等待wake再去第二次poll
join!:并发的executor若其中一个阻塞,则执行其它的,当全部阻塞时,当前函数会阻塞,让将线程的所有权让给执行器所在的函数(线程)。
select!:任意furure完成就退出。
future对数据的访问:
如果future访问的数据会变化或销毁,那么会有内存错误。为此需要Pin住数据(需要数据实现UnPin,通常会默认实现)
p2p network
concept
libp2p, (short for “library peer-to-peer”) is a peer-to-peer (P2P) networking framework that enables the development of P2P applications. It consists of a collection of protocols, specifications, and libraries that facilitate P2P communication between network participants, known as “peers.”
libp2p 旨在解决传统 P2P 网络方法和这些现有网络模型的局限性,目标是实现分布式 Web。
why libp2p:
- 模块化
- 广泛的传输配置
- 多功能
- 安全
- 健壮
- 弹性
- 效率
- 穿透NAT
- 消息分发和传播
- 去中心化
项目:
- IPFS+FileCoin
- Ethereum
- polkadot
- lighthouse
很多:谁在使用 libp2p - libp2p — Who uses libp2p - libp2p
addressing
使用multiaddress作为多种寻址方案的统一约定。
例如:/ip4/192.0.2.0/udp/1234 对两种协议及其基本寻址信息进行编码。/ip4/192.0.2.0 告诉我们需要 IPv4 协议的 192.0.2.0 环回地址,/udp/1234 告诉我们要向端口 1234 发送 UDP 数据包。
multiaddr /p2p/QmYyQSo1c1Ym7orWxLYvCrM2EmxFTANf8wXmmE7DWjhx5N 使用 libp2p 的注册协议 id/p2p/ 和我的 IPFS 节点公钥的 multihash 来唯一标识我的本地 IPFS 节点。
基于以上的信息,组合multiaddr:
/ip4/198.51.100.0/tcp/4242/p2p/QmYyQSo1c1Ym7orWxLYvCrM2EmxFTANf8wXmmE7DWjhx5N
假设我有上述对等 ID
QmYyQSo1c1Ym7orWxLYvCrM2EmxFTANf8wXmmE7DWjhx5N,我的公网 IP 是198.51.100.0。我启动我的 libp2p 应用程序并侦听 TCP 端口4242上的连接这可以扩展为考虑多层寻址和抽象。例如, 用于电路中继的地址将传输地址与多个对等体身份组合在一起,以形成描述“中继电路”的地址:
/ip4/198.51.100.0/tcp/4242/p2p/QmRelay/p2p-circuit/p2p/QmRelayedPeer
protocol
/my-app/amazing-protocol/1.0.1libp2p 协议具有唯一的字符串标识符,这些标识符在首次打开连接时用于协议协商过程。
为了接受链接,libp2p应用程序通过接口(switch,swarm,golang的Host接口)使用ID。使用已注册的协议 ID 标记传入流时,将调用处理程序函数。
binary streams
libp2p 协议所依据的 “媒介” 是具有以下属性的双向二进制流:
- Bidirectional, reliable delivery of binary data
双向、可靠地交付二进制数据
Each side can read and write from the stream at any time
每一端都可以随时从流中读取和写入Data is read in the same order as it was written
数据读取顺序与写入数据的顺序相同Can be “half-closed”, that is, closed for writing and open for reading, or closed for reading and open for writing
可以是“半闭”,即闭写开读,或闭读开写Supports backpressure
支持背压
Readers can’t be flooded by eager writers
读者不能被热心的作家淹没
同时保证流的安全和多路复用。
protocol negotiation
对流和链接使用的协议达成一致的过程。拨出新的流时,libp2p将发送协议ID,另一端处理ID,ID的协议不被支持时将结束流,支持则侦听对等体将回显协议 ID,作为未来通过流发送的数据将使用商定的协议语义的信号。
match protocol ID and version
两种。一种传入协议 ID 和处理程序函数。如果传入流请求发送与协议 ID 完全匹配,则将使用新流作为参数调用处理程序函数,另一种采用三个参数:协议 ID、协议匹配函数和处理程序函数。
Core protocol
使用protobuf定义消息架构,在二进制消息有效负载前加一个整数,该整数表示有效负载的长度(以字节为单位)。长度编码为 protobuf varint (可变长度整数)。
- ping:/ipfs/ping/1.0.0
- identify:/ipfs/id/1.0.0
- identify/push:/ipfs/id/push/1.0.0
- kad-dht:基于kademlia路由算法的分布式哈希表
- circuit relay:/libp2p/circuit/relay/0.1.0
QUIC
QUIC 是一种新的传输协议,它提供始终加密的流多路复用 建立在 UDP 之上的连接.
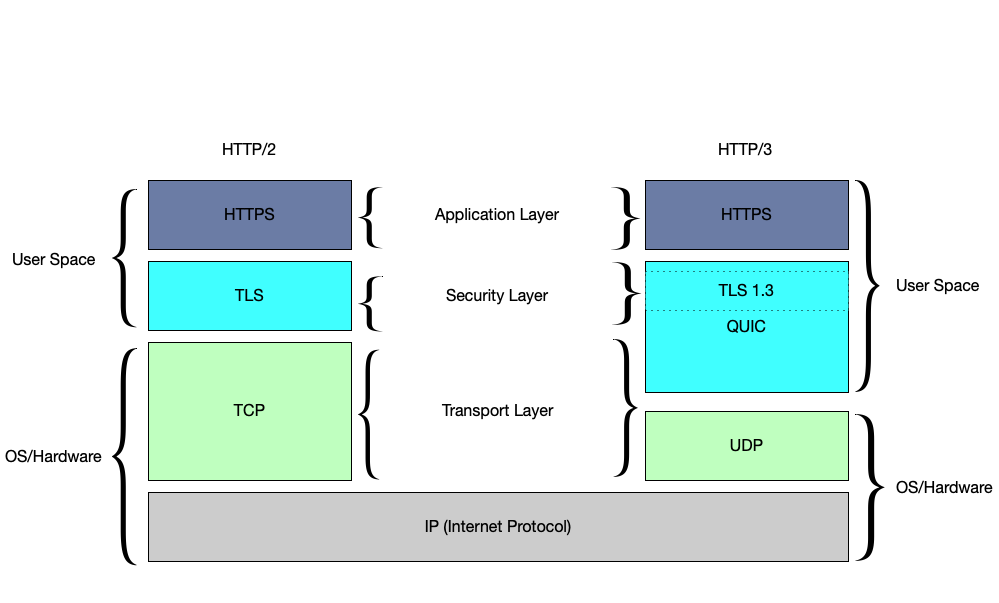
它作为加密层参与http3协议,用udp作为传输层协议实现了单次RTT和多个流,从而不需要multiplexing
对比TCP:
- HoL阻塞:tcp在阻塞后,之后交付的数据包需要在内核缓冲区中等待,直到收到丢失数据包的重新传输。
QUIC则只会阻塞一个流 - 僵化Ossification:由于 TCP 数据包的 header 没有加密,中间设备可以检查和修改 TCP header 字段,当遇到不理解的内容时可能会意外中断。这使得几乎不可能对 TCP 协议部署任何更改线路格式的更改。
QUIC尽可能加密,从而避免僵化 - 握手:TCP需要两个RTT,一次验证客户端地址,另一次启动加密握手。
QUIC减少新连接建立到单个 RTT 的延迟,并允许为恢复的连接发送 0 RTT 应用程序数据。
in p2p
libp2p 仅支持双向流,默认使用 TLS 1.3。由于 QUIC 已经提供了加密的流多路复用连接,因此 libp2p 直接使用 QUIC 流,无需任何其他帧。遵循多地址格式,标准 QUIC 连接将如下所示: /ip4/192.0.2.0/udp/65432/quic-v1/ 。
Stream
流是计算机网络中一种有序、可靠的双向数据传输通道。它提供端到端的逻辑连接,确保数据按发送顺序到达接收方。
应用:
| 协议层 | 实现形式 | 特点 |
|---|---|---|
| TCP | 字节流(Byte Stream) | 无消息边界,需应用层处理分包 |
| HTTP/2 | 逻辑消息流(Message Stream) | 在单个TCP连接上多路复用多个请求 |
| QUIC | 独立流(Isolated Stream) | 每个流独立处理,避免队头阻塞 |
multiplexing
多路复用是在单一物理连接上同时传输多个独立数据流的技术,其核心价值在于:
- 提升连接利用率:避免频繁建立/断开连接的开销;
- 降低延迟:并行处理多个数据交互;
- 资源高效:减少端口和内存占用。
| 类型 | 原理 | 典型协议 | 优缺点 |
|---|---|---|---|
| 端口复用 | 通过不同端口区分服务 | HTTP/1.1 | 简单但扩展性差 |
| 帧标识复用 | 为每个流分配唯一ID标识 | HTTP/2, QUIC | 高效但需复杂状态管理 |
| 信道化复用 | 物理划分时隙/频段 | 传统电话网络 | 资源固定分配,利用率低 |
协议中的多路复用
| 协议 | 多路复用创新 | 性能提升指标 |
|---|---|---|
| HTTP/3 | 基于QUIC的流多路复用 | 页面加载时间↓35% |
| gRPC | 利用HTTP/2流实现RPC调用复用 | QPS↑4倍 |
| WebTransport | 基于UDP的流式传输 | 延迟↓50% |
- 实时视频会议 → 优先选择QUIC协议,利用独立流避免卡顿
- 微服务通信 → 采用gRPC的HTTP/2流复用提升吞吐量
- IoT设备管理 → 使用CoAP的块传输实现低功耗多路复用
Project
protocol/floodsub
Floodsub 基本逻辑就是订阅消息、发送消息与传递消息。每一个节点在收到消息后,都会对连接的全部节点进行发送消息,“一传十,十传百”,真的就是字面上的意思,所以会造成大量的重复发送,是一种以带宽换取传播速度的方式,适合小型网络。
event
pub struct Behaviour {
    /// Events that need to be yielded to the outside when polling.
    events: VecDeque<ToSwarm<Event, FloodsubRpc>>,

    ///...
}
包装了Toswarm的类型,而ToSwarm有以下的内容
pub enum ToSwarm<TOutEvent, TInEvent> {
    /// Instructs the `Swarm` to return an event when it is being polled.
    GenerateEvent(TOutEvent),


    Dial { opts: DialOpts },

    /// Instructs the [`Swarm`](crate::Swarm) to listen on the provided address.
    ListenOn { opts: ListenOpts },

    /// Instructs the [`Swarm`](crate::Swarm) to remove the listener.
    RemoveListener { id: ListenerId },


    NotifyHandler {
        /// The peer for whom a [`ConnectionHandler`] should be notified.
        peer_id: PeerId,
        /// The options w.r.t. which connection handler to notify of the event.
        handler: NotifyHandler,
        /// The event to send.
        event: TInEvent,
    },


    NewExternalAddrCandidate(Multiaddr),


    ExternalAddrConfirmed(Multiaddr),


    ExternalAddrExpired(Multiaddr),


    CloseConnection {
        /// The peer to disconnect.
        peer_id: PeerId,
        /// Whether to close a specific or all connections to the given peer.
        connection: CloseConnection,
    },


    NewExternalAddrOfPeer { peer_id: PeerId, address: Multiaddr },
}
可见event几乎涵盖了节点的功能相关的枚举类型,layer中的很多方法实现的就是将方法对应的事件塞入events队列的尾部。
应当执行event时则会调用poll函数(见异步编程的future部分)
fn poll(&mut self, _: &mut Context<'_>) -> Poll<ToSwarm<Self::ToSwarm, THandlerInEvent<Self>>> {
if let Some(event) = self.events.pop_front() {
return Poll::Ready(event);
}
Poll::Pending
}关注
pub fn subscribe(&mut self, topic: Topic) -> bool {
        if self.subscribed_topics.iter().any(|t| t.id() == topic.id()) {
            return false;
        }

        for peer in self.connected_peers.keys() {
            self.events.push_back(ToSwarm::NotifyHandler {
                peer_id: *peer,
                handler: NotifyHandler::Any,
                event: FloodsubRpc {
                    messages: Vec::new(),
                    subscriptions: vec![FloodsubSubscription {
                        topic: topic.clone(),
                        action: FloodsubSubscriptionAction::Subscribe,
                    }],
                },
            });
        }

        self.subscribed_topics.push(topic);
        true
    }

    /// Unsubscribes from a topic.
    ///
    /// Note that this only requires the topic name.
    ///
    /// Returns true if we were subscribed to this topic.
    pub fn unsubscribe(&mut self, topic: Topic) -> bool {
        let Some(pos) = self.subscribed_topics.iter().position(|t| *t == topic) else {
            return false;
        };

        self.subscribed_topics.remove(pos);

        for peer in self.connected_peers.keys() {
            self.events.push_back(ToSwarm::NotifyHandler {
                peer_id: *peer,
                handler: NotifyHandler::Any,
                event: FloodsubRpc {
                    messages: Vec::new(),
                    subscriptions: vec![FloodsubSubscription {
                        topic: topic.clone(),
                        action: FloodsubSubscriptionAction::Unsubscribe,
                    }],
                },
            });
        }

        true
    }
解释:
- handler:NotifyHandler::Any :: floodsub 只需要将消息传递给对等节点一次,而不需要通过所有连接都发送相同的消息。Any不关心具体的连接节点,只关心消息是否传达到对等节点。
chat
参考了官方库的example
里面使用了gossipsub,不同于floodsub适用于小型网络,它更适用于区块链和p2p聊天。
Gossipsub 是一种基于 Gossip(流言)协议 的 发布/订阅(PubSub) 消息传播机制,旨在高效、可靠地在 P2P 网络中广播消息。它结合了 Floodsub(泛洪协议) 的简单性和 Gossip 协议 的扩展性,同时优化了带宽使用和消息传播效率。
- Mesh 网络(主题网格):
- 每个主题(Topic)维护一个 Mesh,即一组稳定连接的节点(Peer),用于高效传播消息。
- Mesh 的大小受
D(期望连接数)参数控制,避免过度连接或孤立节点。
- Fanout 机制(非订阅发布):
- 允许节点向未订阅的主题发送消息(如临时广播),并记录目标节点,避免全网络泛洪。
- Control Messages(控制消息):
- IHAVE/IWANT:用于请求/提供缺失的消息(类似 BitTorrent 的块交换)。
- GRAFT/PRUNE:动态调整 Mesh 成员(加入或剔除节点)。
- 消息缓存(Message Cache):
- 记录最近的消息 ID,防止重复传播,并支持按需拉取(IWANT 机制)。
topic作为聊天室的范围,聊天节点可以随时加入或离开,IHAVE/IWANT 机制确保即使部分节点离线,消息仍可通过其他节点补全。
上述的特点在这个publish函数中都能找到
数据转换:对原始数据进行可选的转换(如压缩)
消息构建:根据发布配置(签名/匿名/随机作者)构建原始消息
消息验证:检查消息大小和是否为重复消息
选择接收者
:根据不同策略选择消息接收节点
- 如果启用了洪泛发布 (
flood_publish),向所有订阅的高分节点发送- 如果是正常 Gossipsub 逻辑,则使用 mesh(有主题) 或 fanout(无主题,mesh中随机配凑fanout) 机制
缓存消息:将消息保存在本地缓存中,用于处理重复消息
发送消息:向所有选定的接收者发送消息
pub fn publish( |
构建chat的流程:
配置swarm:tokio+tcp+quic+交互逻辑
交互逻辑使用with_behaviour配置:.with_behaviour(|key| {
// 配置 gossipsub 消息 ID 生成函数
let message_id_fn = |message: &gossipsub::Message| {
let mut s = DefaultHasher::new();
message.data.hash(&mut s);
gossipsub::MessageId::from(s.finish().to_string())
};
// 构建 gossipsub 配置
let gossipsub_config = gossipsub::ConfigBuilder::default()
.heartbeat_interval(Duration::from_secs(5))
.validation_mode(gossipsub::ValidationMode::Permissive)
.message_id_fn(message_id_fn)
.build()
.map_err(io::Error::other)?;
// 创建 gossipsub 行为
let gossipsub = gossipsub::Behaviour::new(
gossipsub::MessageAuthenticity::Signed(key.clone()),
gossipsub_config,
)?;
// 创建 mdns 行为
let mdns = mdns::tokio::Behaviour::new(mdns::Config::default(), key.public().to_peer_id())?;
// 返回你的自定义行为组合
Ok(MyBehaviour {
gossipsub,
mdns,
})
})?其中mdns协议负责在本地网络自动发现其他节点,设置了gossipsub的消息ID生成函数和参数。最后返回的MyBehaviour由程序自定义,通过
#[derive(NetworkBehaviour)]统一行为,在3中作为异步事件的参数设置topic和stdin流
进入异步事件循环
loop {
        select! {
            Ok(Some(line)) = stdin.next_line() => {
                // let message = gossipsub::Message {
                //     data: line.as_bytes().to_vec(),
                //     sequence_number: None,
                //     topic: topic.clone().into(),
                //     source: None,
                // };
                if let Err(e) = swarm
                    .behaviour_mut().gossipsub
                    .publish(topic.clone(), line.as_bytes()) {
                    println!("Publish error: {e:?}");
                }
            }
            event = swarm.select_next_some() => match event {
                SwarmEvent::Behaviour(MyBehaviourEvent::Mdns(mdns::Event::Discovered(list))) => {
                    for (peer_id, _multiaddr) in list {
                        println!("mDNS discovered a new peer: {peer_id}");
                        swarm.behaviour_mut().gossipsub.add_explicit_peer(&peer_id);
                    }
                    let topic_peers_len = swarm.behaviour().gossipsub.all_peers()
                        .count();
                    println!("Connected peers for topic 'chat': {} peers", topic_peers_len);
                },
                SwarmEvent::Behaviour(MyBehaviourEvent::Mdns(mdns::Event::Expired(list))) => {
                    for (peer_id, _multiaddr) in list {
                        println!("mDNS discover peer has expired: {peer_id}");
                        swarm.behaviour_mut().gossipsub.remove_explicit_peer(&peer_id);
                    }
                },
                SwarmEvent::Behaviour(MyBehaviourEvent::Gossipsub(gossipsub::Event::Message {
                    propagation_source: peer_id,
                    message_id: id,
                    message,
                })) => println!(
                        "Got message: '{}' with id: {id} from peer: {peer_id}",
                        String::from_utf8_lossy(&message.data),
                    ),
                SwarmEvent::NewListenAddr { address, .. } => {
                    println!("Local node is listening on {address}");
                }
                _ => {}
            }

        }
事件循环中的
stdin.next_line()和event = swarm.select_next_some()具有异步属性,通过select宏统一执行。每次循环直到执行完其中一个后结束。网络事件主要有mdns的discover+expired和gossipsub的消息传输。
有个扩展作业,实现chat的私聊功能:
deepseek给的实现方案如下:
| 方案 | 隐私性 | 实现难度 | 扩展性 | 适用场景 |
|---|---|---|---|---|
| 消息头标记法(@) | 低 | 简单 | 高 | 快速原型开发 |
| 独立私聊 Topic | 中 | 中等 | 中 | 中小规模固定群组 |
| 端到端加密(E2E) | 高 | 复杂 | 高 | 高安全性需求 |
| 直接连接(Stream) | 最高 | 最复杂 | 低 | 一对一实时通信 |
按我的直觉来说第一个方案实现的最差,可以被别人伪装,第三个方案像是我会做的。方案二意外的不错。
优化后尝试把2和3结合:
- 强制订阅检查:发送私聊前,确认对方已订阅目标 Topic(可通过
gossipsub.subscribed_peers(topic)检查)。 - 动态重试:如果对方未订阅,先发送控制消息(如
"@B请订阅 /chat/private/A-B"),再重发私聊消息。 - 限制私聊 Topic 数量:例如,每个 Peer 最多同时维护 10 个私聊 Topic,超时自动清理。
- 按需订阅:仅在需要通信时订阅 Topic,结束后取消订阅(
gossipsub.unsubscribe(topic))。 - 哈希化 Topic 名称:例如,用
sha256(local_peer_id + remote_peer_id)生成不可预测的 Topic。 - 临时 Topic:每次会话生成随机 Topic,并通过安全通道(如方案 3 的 E2E 加密)通知对方。
具体的代码实现可能得有空闲时间的时候来实现
Write a CLI
非常好代码book,这一大节的参考:入门 - Rust 中的命令行应用程序 - Rust CLI 中文
clap = {version = "4.0", features = ["derive"]}以及以下代码
use clap::Parser; |
执行之后会得到 aa Pattern和后面的Path输出
Error handling
尝试用result + match语句来处理
let my_async_result = |
现在,我们能够访问文件的内容,但在 match 块之后我们无法真正对它做任何事情。为此,我们需要以某种方式处理错误情况。挑战在于 match 块的所有分支都需要返回相同类型的某些内容。可以尝试unwrap(像addr一行)或者?let content = std::fs::read_to_string("test.txt")?;
当然,时间富裕的首选是自定义错误处理,其次使用更成熟的库。
在anyhow库中:
use anyhow::{Context, Result}; |
由此修改上面的代码:
|
Pattern: aa
Path: “src/main”
Error: Failed to read file: src/mainCaused by:
No such file or directory (os error 2)
可以看见它保留了原始的错误和我们自定义的错误描述
pipe
应通过
stderr打印错误,以便用户和其他工具更容易将输出管道传输到文件或更多工具。注意:在大多数操作系统上,程序可以写入两个输出流,
stdout和stderr。stdout用于程序的实际输出,而stderr允许错误和其他消息与stdout分开。这样,输出可以存储到文件中或管道传输到另一个程序,而错误会显示给用户。在 Rust 中,这是通过
println!和eprintln!实现的,前者打印到stdout,后者打印到stderr。
如果有转义字符,避免他们改变用户的terminal输出。可以用ansi_term这种crate。
print quickly
直接调用println会很慢,为此使用一个缓冲区会有用。
use std::io::{self, Write}; |
直接这么写会得到warning
warning: unused
Resultthat must be used
–> src/main.rs:22:5
|
22 | writeln!(handle, “Pattern: {}”, args.pattern);
| ^^^^^^^^^^^^^^^^^^^^^^^^^^^^^^^^^^^^^^^^^^^^^
|
= note: thisResultmay be anErrvariant, which should be handled
= note:#[warn(unused_must_use)]on by default
= note: this warning originates in the macrowriteln(in Nightly builds, run with -Z macro-backtrace for more info)
为了去掉warning,锁定 stdout(或 stderr)并使用 writeln! 直接打印到它会有所帮助。这也可以防止系统反复锁定和解锁 stdout。为了简洁可以包装成一个函数
fn print_stdout<T: std::fmt::Display>(s: T) { |
进度条
使用 indicatif 板条箱,您可以向您的程序添加进度条和小旋转器。这是一个快速示例
fn main() { |
log
cli需要日志。
向您的应用程序添加简单记录,您需要两件事:log 板条箱(它包含以日志级别命名的宏)和一个实际将日志输出写入某个有用位置的适配器。能够使用日志适配器非常灵活:例如,您可以使用它们将日志写入终端,还可以写入 syslog 或中央日志服务器。
由于我们现在只关心编写 CLI 应用程序,因此一个易于使用的适配器是 env_logger。它被称为“env”记录器,因为您可以使用环境变量来指定要记录应用程序的哪些部分(以及要记录它们的级别)。它将在您的日志消息前面加上时间戳和日志消息来自的模块。由于库也可以使用 log,因此您也可以轻松配置它们的日志输出。
|
整个程序略显臃肿。
test
测试驱动开发可以看看这个
rust有内置的测试框架,只是测试的话不该写在这里。
那么如何测试一个CLI程序?
首先从单元测试开始。
fn find_matches(content: &str, pattern: &str) -> Vec<(usize, String)> { |
此时打印在日志中可以简单捕获。如果是会打印到stdout中的功能,则需要std::io::Writetrait的实现
例如下面的代码:
fn print_stdout_with_handle<T: std::fmt::Display>(s: T, handle: &mut impl Write) { |
buffer参数的存在能让测试时获得stdout的数据用于测试。
为了易于测试,做到的东西会有:
- 确定了我们应用程序的核心部分之一,
- 将其放入自己的函数中,
- 并使其更加灵活。
当然作为命令行程序也要从用户的角度测试使用,可以尝试assert_fs
use assert_fs::prelude::*; |
根据你的程序的性质,你还可以尝试添加更多的测试技术。例如,如果你已经提取了程序的部分内容,并且发现自己在编写大量示例用例作为单元测试,同时试图找出所有边缘情况,你应该研究
proptest。如果你的程序消耗任意文件并解析它们,请尝试编写一个 fuzzer 以查找边缘情况下的错误。
more
处理ctrl+c等unix信号:https://crates.io/crates/signal-hook
使用通道作为线程同步点:https://crates.io/crates/crossbeam-channel
future和streams:如果您正在使用 tokio,您很可能已经使用异步模式和事件驱动设计来编写应用程序。您可以启用 signal-hook 的 tokio-support 功能,而不是直接使用 crossbeam 的通道。这允许您在 signal-hook 的 Signals 类型上调用 .into_async(),以获取一个实现 futures::Stream 的新类型。
配置文件的使用:https://docs.rs/confy/0.3.1/confy/
友好地处理panic:https://crates.io/crates/human-panic
区分使用者是人类还是Terminal:https://doc.rust-lang.net.cn/stable/std/io/trait.IsTerminal.html
为命令行渲染文档:https://crates.io/crates/clap_mangen
thread/process
进程和线程的处理方式存在许多细微的差异。最重要的区别是内存在线程之间共享,而不是在进程之间共享。这意味着进程之间的通信是通过某种消息传递进行的,类似于在不同计算机上运行的程序之间的通信。