我的博客地址:uloveRock? - God knows…
welcome!
rCore-ch1 环境执行 fn main () { println! ("hello,world" ); }
从修改hello world,使它不用系统自带的依赖开始
修改目标平台
# os/.cargo/config
[build]
target = "riscv64gc-unknown-none-elf"
移除标准库依赖
#![no_std] #![no_main] mod lang_items;pub extern "C" fn _start () { loop {} }
同级目录新建一个lang_items.rs
use core::panic::PanicInfo;#[panic_handler] fn panic (_info: &PanicInfo) -> ! { loop { } }
如此便移除了所有标准库依赖,可尝试cargo build看看全新的程序了
file /path/to/elf rust-readobj -h /path/to/elf rust-objdump -S /path/to/elf
用户态 先前的main.rs里已经有了程序入口,可尝试给qemu-riscv64跑一个看看
第一次跑段错误了,后面跟教程修改了一些才能够正常运行
fn syscall (id: usize , args: [usize ; 3 ]) -> isize { let mut ret ; unsafe { core::arch::asm!( "ecall" , inlateout ("x10" ) args[0 ] => ret, in ("x11" ) args[1 ], in ("x12" ) args[2 ], in ("x17" ) id, ); } ret }
这是一个神秘的函数,它通过使用内联汇编方便地使用core库提供给的系统调用.比如目前执行环境缺少一个退出机制:
const SYSCALL_EXIT: usize = 93 ;fn syscall (id: usize ,args: [usize ;3 ]) -> isize {...}pub fn sys_exit (xstate: i32 ) -> isize { syscall (SYSCALL_EXIT, [xstate as usize , 0 , 0 ]) } #[no_mangle] extern "C" fn _start () { sys_exit (9 ); }
再传给qemu就能正常运行,还能通过$?参数接受退出码
如果要实现Stdout,也是类似的,复杂一点:
use core::fmt;use core::fmt::Write;const SYSCALL_WRITE: usize = 64 ;pub fn sys_write (fd: usize , buffer: &[u8 ]) -> isize { syscall (SYSCALL_WRITE, [fd, buffer.as_ptr () as usize , buffer.len ()]) }
再基于这个封装实现stdout
struct Stdout ;impl Write for Stdout { fn write_str (&mut self , s: &str ) -> fmt::Result { sys_write (1 , s.as_bytes ()); Ok (()) } } pub fn print (args: fmt::Arguments) { Stdout.write_fmt (args).unwrap (); }
其实此时已经可以通过print输出字符串了,就是类型上会有点别扭(毕竟没有标准库)
再来点看不懂的格式化宏
#[macro_export] macro_rules! print { ($fmt: literal $(, $($arg: tt)+)?) => { $crate::console::print (format_args! ($fmt $(, $($arg)+)?)); } } #[macro_export] macro_rules! println { ($fmt: literal $(, $($arg: tt)+)?) => { print (format_args! (concat! ($fmt, "\n" ) $(, $($arg)+)?)); } } #[no_mangle] extern "C" fn _start () { println! ("Hello, world!" ); sys_exit (9 ); }
此时如果想用objdump看看的话,就会发现多了特别多的依赖之类,而上面写的源码编译出来的东西(除了宏,宏的编译结果我没法直接看出来)只占其中一部分,我的objdump结果总共2000行,其中300行左右是我们的源码
裸机环境 用qemu的`qemu-system-riscv64模拟risc-v 64构建裸机环境,加载内核的命令:
-bios $(bootloader)加载bootloader,即rustSBI,-device loader,file=$(KERNEL_BIN),addr=$(KERNEL_ENTRY_PA)表示硬件内存中的特定位置即$(KERNEL_ENTRY_PA)放置了操作系统的二进制程序$(KERNEL_BIN),entry_pa值是0x80200000
当我们执行包含上述启动参数的 qemu-system-riscv64 软件,就意味给这台虚拟的 RISC-V64 计算机加电了。 此时,CPU 的其它通用寄存器清零,而 PC 会指向 0x1000 的位置,这里有固化在硬件中的一小段引导代码, 它会很快跳转到 0x80000000 的 RustSBI 处。 RustSBI完成硬件初始化后,会跳转到 $(KERNEL_BIN) 所在内存位置 0x80200000 处, 执行操作系统的第一条指令。
当在裸机环境运行时,需要有关机功能
fn sbi_call (which: usize , arg0: usize , arg1: usize , arg2: usize ) -> usize { let mut ret ; unsafe { core::arch::asm!( "ecall" , ... const SBI_SHUTDOWN: usize = 8 ;pub fn shutdown () -> ! { sbi_call (SBI_SHUTDOWN, 0 , 0 , 0 ); panic! ("It should shutdown!" ); } #[no_mangle] extern "C" fn _start () { shutdown (); }
“ecall”和上以迎接不同在于特权级:
User Mode < Supervisor Mode < Machine Mode,分别对应”应用程序\操作系统\RustSBI”
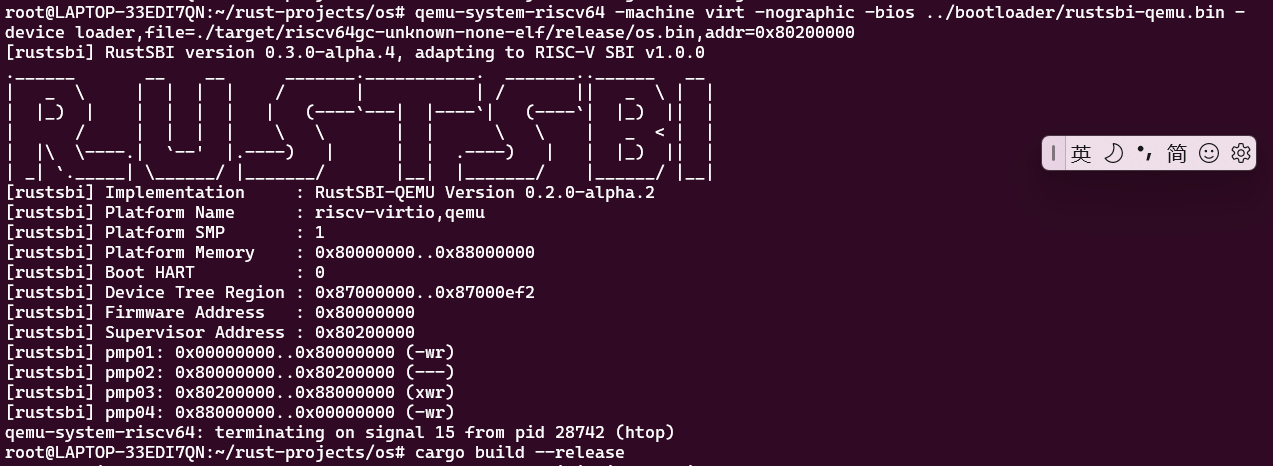
编译结果如下:(ctlr C无法退出,用了类似kill的工具)
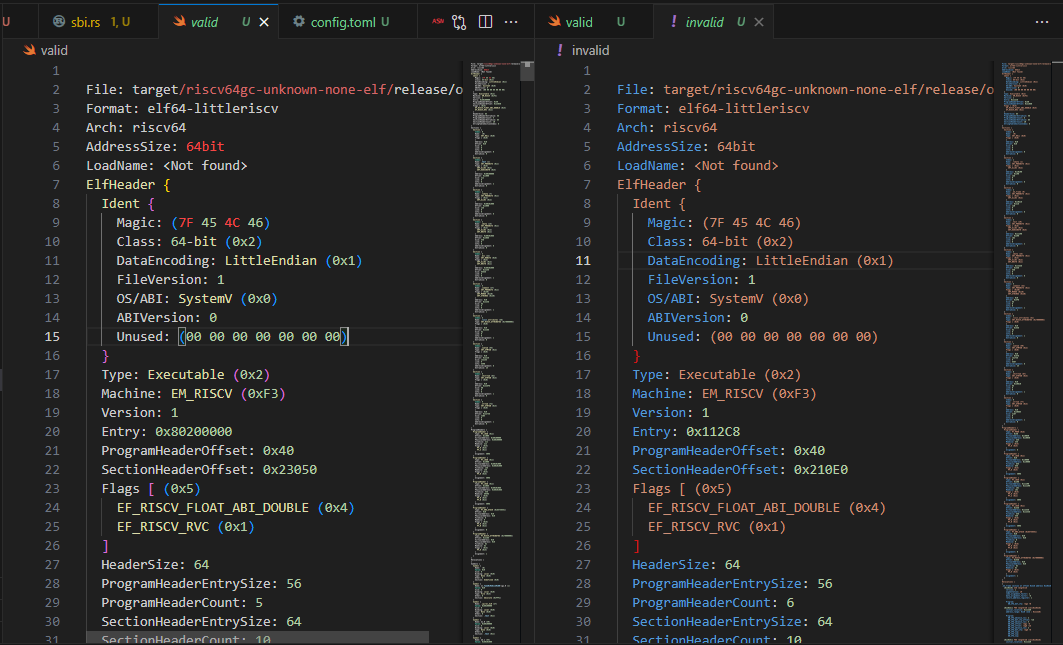
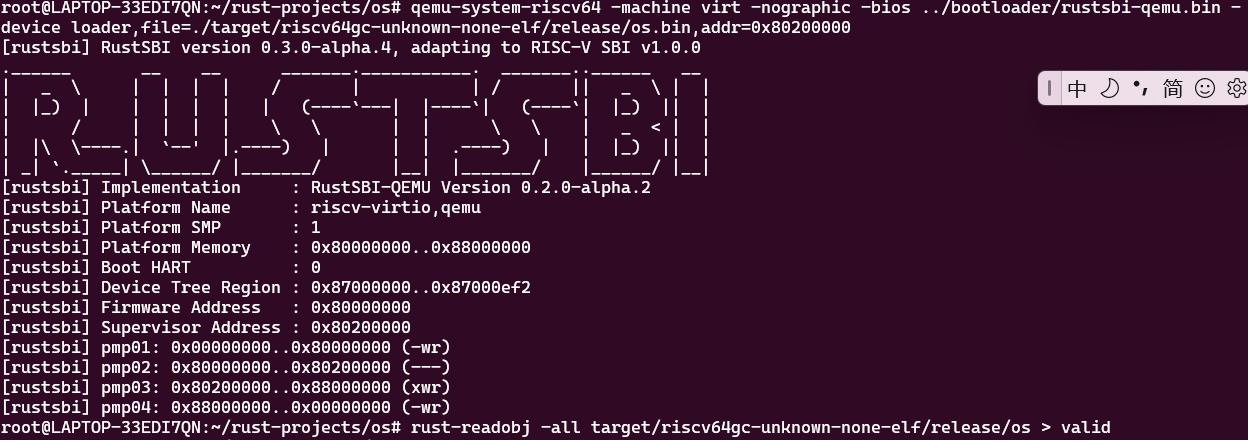
用rust-readobj看:(valid是后面通过qemu正常自动退出的结果,invalid是目前这个卡住的)
发现其入口地址不是 RustSBI 约定的 0x80200000,需要修改内存布局
增加链接脚本: 首先在cargo的配置文件中加入自己的链接脚本:
// os/.cargo/config
[build]
target = "riscv64gc-unknown-none-elf"

[target.riscv64gc-unknown-none-elf]
rustflags = [
    "-Clink-arg=-Tsrc/linker.ld", "-Cforce-frame-pointers=yes"
]
然后在os/src/新建一linker.ld:
OUTPUT_ARCH(riscv)
ENTRY(_start)
BASE_ADDRESS = 0x80200000;

SECTIONS
{
    . = BASE_ADDRESS;
    skernel = .;

    stext = .;
    .text : {
        *(.text.entry)
        *(.text .text.*)
    }

    . = ALIGN(4K);
    etext = .;
    srodata = .;
    .rodata : {
        *(.rodata .rodata.*)
    }

    . = ALIGN(4K);
    erodata = .;
    sdata = .;
    .data : {
        *(.data .data.*)
    }

    . = ALIGN(4K);
    edata = .;
    .bss : {
        *(.bss.stack)
        sbss = .;
        *(.bss .bss.*)
    }

    . = ALIGN(4K);
    ebss = .;
    ekernel = .;

    /DISCARD/ : {
        *(.eh_frame)
    }
}
初始化栈空间
再在同一文件夹新建一个entry.asm,用以初始化栈空间
    .section .text.entry
    .globl _start
_start:
    la sp, boot_stack_top
    call rust_main

    .section .bss.stack
    .globl boot_stack
boot_stack:
    .space 4096 * 16
    .globl boot_stack_top
boot_stack_top:
可以看到此时在初始化空间之后直接call了一个新函数rust_main,于是我们也要在main.rs内补充同名函数以满足
core::arch::global_asm!(include_str! ("entry.asm" )); #[no_mangle] pub fn rust_main () -> ! { shutdown (); }
再把原本的_start注释掉
再次编译并生成和运行,可以看到qemu成功退出
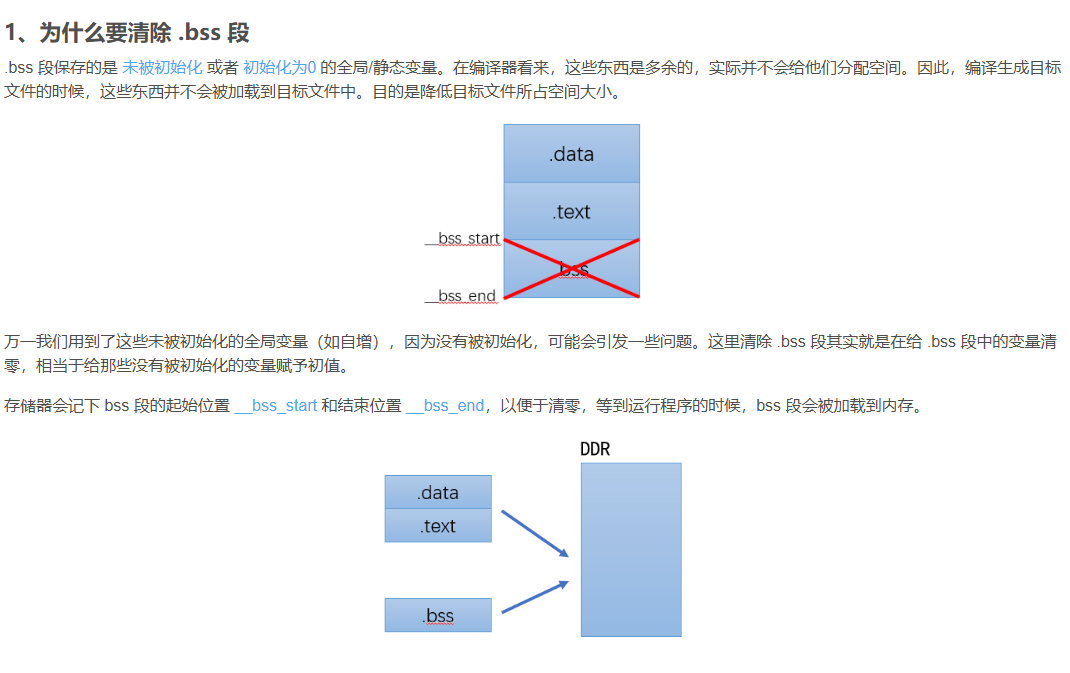
再清空一下.bss段,关于为什么
清除的方法即增加在main.rs中的clear_bss()
fn clear_bss () { extern "C" { fn sbss (); fn ebss (); } (sbss as usize ..ebss as usize ).for_each(|a| { unsafe { (a as *mut u8 ).write_volatile (0 ) } }); } pub fn rust_main () -> ! { clear_bss (); shutdown (); }
再经过一些对原项目的加工(Ctrl cv),终于能hello world了!
rCore-ch2 todo What? 说实话我在看到这一章的时候挺茫然的,满篇的东西都是在介绍,不知道我要干什么。
那么来总结一下这一章书上的内容先:
批处理系统:多个程序打包到一起输入计算机,程序结束自动执行下一个。为避免出错时整个环境崩溃,引入特权级,分开用户、内核。
应用程序: 项目文件里准备了bin文件夹对应各个应用程序。每个程序在main函数内实现了用户程序的功能。使用的依赖对应lib.rs(类似于一个标准库)。lib.rs中定义了_start用于初始化应用程序
批处理: 内核通过link_app.S获知应用程序的数量和位置,通过AppManager来加载应用程序的二进制码.加载时需要清除缓存,清空内存,将二进制程序复制到正确位置.
特权转换: 特权被一些对应用的切换和监控操作需要,比如初始化,处理系统调用,应用出错的处理程序,结束程序时的切换
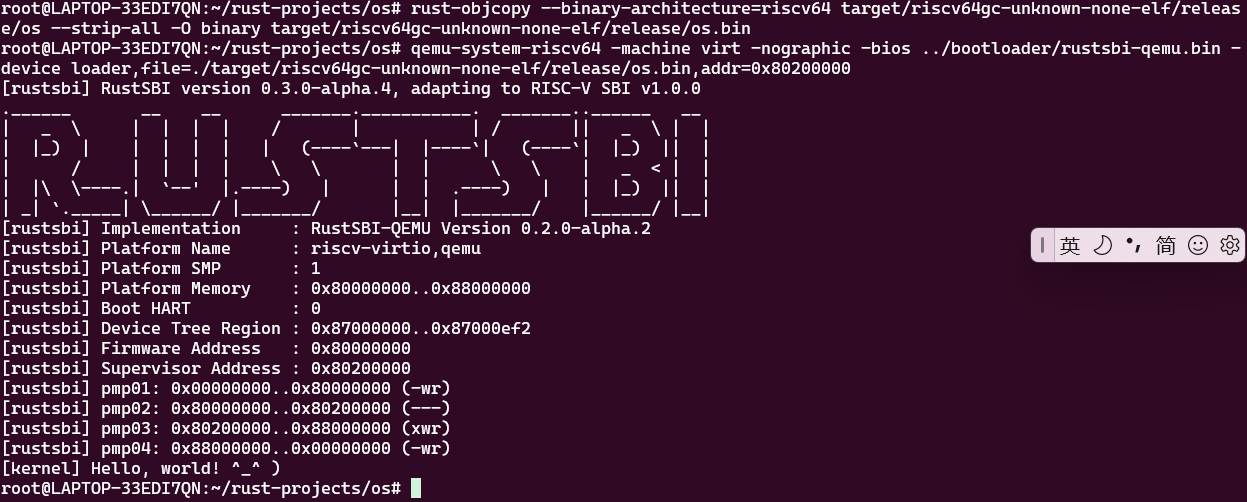
在看看程序跑一遍的结果:
[rustsbi] RustSBI version 0.3.0-alpha.4, adapting to RISC-V SBI v1.0.0
.______       __    __      _______.___________.  _______..______   __
|   _  \     |  |  |  |    /       |           | /       ||   _  \ |  |
|  |_)  |    |  |  |  |   |   (----`---|  |----`|   (----`|  |_)  ||  |
|      /     |  |  |  |    \   \       |  |      \   \    |   _  < |  |
|  |\  \----.|  `--'  |.----)   |      |  |  .----)   |   |  |_)  ||  |
| _| `._____| \______/ |_______/       |__|  |_______/    |______/ |__|
[rustsbi] Implementation     : RustSBI-QEMU Version 0.2.0-alpha.2
[rustsbi] Platform Name      : riscv-virtio,qemu
[rustsbi] Platform SMP       : 1
[rustsbi] Platform Memory    : 0x80000000..0x88000000
[rustsbi] Boot HART          : 0
[rustsbi] Device Tree Region : 0x87000000..0x87000ef2
[rustsbi] Firmware Address   : 0x80000000
[rustsbi] Supervisor Address : 0x80200000
[rustsbi] pmp01: 0x00000000..0x80000000 (-wr)
[rustsbi] pmp02: 0x80000000..0x80200000 (---)
[rustsbi] pmp03: 0x80200000..0x88000000 (xwr)
[rustsbi] pmp04: 0x88000000..0x00000000 (-wr)
[kernel] Hello, world!
[ INFO] [kernel] .data [0x8020b000, 0x80228000)
[ WARN] [kernel] boot_stack top=bottom=0x80238000, lower_bound=0x80228000
[ERROR] [kernel] .bss [0x80238000, 0x80239000)
[kernel] num_app = 7
[kernel] app_0 [0x8020b048, 0x8020f0f0)
[kernel] app_1 [0x8020f0f0, 0x80213198)
[kernel] app_2 [0x80213198, 0x80217240)
[kernel] app_3 [0x80217240, 0x8021b2e8)
[kernel] app_4 [0x8021b2e8, 0x8021f390)
[kernel] app_5 [0x8021f390, 0x80223438)
[kernel] app_6 [0x80223438, 0x802274e0)
[kernel] Loading app_0
[kernel] PageFault in application, kernel killed it.
[kernel] Loading app_1
[kernel] IllegalInstruction in application, kernel killed it.
[kernel] Loading app_2
[kernel] IllegalInstruction in application, kernel killed it.
[kernel] Loading app_3
Hello, world from user mode program!
[kernel] Loading app_4
power_3 [10000/200000]
power_3 [20000/200000]
power_3 [30000/200000]
power_3 [40000/200000]
power_3 [50000/200000]
power_3 [60000/200000]
power_3 [70000/200000]
power_3 [80000/200000]
power_3 [90000/200000]
power_3 [100000/200000]
power_3 [110000/200000]
power_3 [120000/200000]
power_3 [130000/200000]
power_3 [140000/200000]
power_3 [150000/200000]
power_3 [160000/200000]
power_3 [170000/200000]
power_3 [180000/200000]
power_3 [190000/200000]
power_3 [200000/200000]
3^200000 = 871008973(MOD 998244353)
Test power_3 OK!
[kernel] Loading app_5
power_5 [10000/140000]
power_5 [20000/140000]
power_5 [30000/140000]
power_5 [40000/140000]
power_5 [50000/140000]
power_5 [60000/140000]
power_5 [70000/140000]
power_5 [80000/140000]
power_5 [90000/140000]
power_5 [100000/140000]
power_5 [110000/140000]
power_5 [120000/140000]
power_5 [130000/140000]
power_5 [140000/140000]
5^140000 = 386471875(MOD 998244353)
Test power_5 OK!
[kernel] Loading app_6
power_7 [10000/160000]
power_7 [20000/160000]
power_7 [30000/160000]
power_7 [40000/160000]
power_7 [50000/160000]
power_7 [60000/160000]
power_7 [70000/160000]
power_7 [80000/160000]
power_7 [90000/160000]
power_7 [100000/160000]
power_7 [110000/160000]
power_7 [120000/160000]
power_7 [130000/160000]
power_7 [140000/160000]
power_7 [150000/160000]
power_7 [160000/160000]
7^160000 = 667897727(MOD 998244353)
Test power_7 OK!
All applications completed!
再跟着代码看看运行的过程经历了什么(也就是看看源码,不想自己敲的懒狗发言XD)
#[no_mangle] pub fn rust_main () -> ! { extern "C" { fn stext (); fn etext (); fn srodata (); fn erodata (); fn sdata (); fn edata (); fn sbss (); fn ebss (); fn boot_stack_lower_bound (); fn boot_stack_top (); } clear_bss (); logging::init (); println! ("[kernel] Hello, world!" ); trace!( "[kernel] .text [{:#x}, {:#x})" , stext as usize , etext as usize ); debug!( "[kernel] .rodata [{:#x}, {:#x})" , srodata as usize , erodata as usize ); info!( "[kernel] .data [{:#x}, {:#x})" , sdata as usize , edata as usize ); warn!( "[kernel] boot_stack top=bottom={:#x}, lower_bound={:#x}" , boot_stack_top as usize , boot_stack_lower_bound as usize ); error!("[kernel] .bss [{:#x}, {:#x})" , sbss as usize , ebss as usize ); trap::init (); batch::init (); batch::run_next_app (); }
由于make run LOG=INFO的指令,可以看到从helloworld到error这三行是这里的输出.main之后是两个init和一个run_next
CodeReading-CorePart 1.trap
pub fn init () { extern "C" { fn __alltraps (); } unsafe { stvec::write (__alltraps as usize , TrapMode::Direct); } }
这里的init原谅我不是很明白.在同级文件夹找到了__alltraps的具体内容
# os/src/trap/trap.S
__alltraps:
    csrrw sp, sscratch, sp
    # now sp->kernel stack, sscratch->user stack
    # allocate a TrapContext on kernel stack
    addi sp, sp, -34*8
    # save general-purpose registers
    sd x1, 1*8(sp)
    # skip sp(x2), we will save it later
    sd x3, 3*8(sp)
    # skip tp(x4), application does not use it
    # save x5~x31
    .set n, 5
    .rept 27
        SAVE_GP %n
        .set n, n+1
    .endr
    # we can use t0/t1/t2 freely, because they were saved on kernel stack
    csrr t0, sstatus
    csrr t1, sepc
    sd t0, 32*8(sp)
    sd t1, 33*8(sp)
    # read user stack from sscratch and save it on the kernel stack
    csrr t2, sscratch
    sd t2, 2*8(sp)
    # set input argument of trap_handler(cx: &mut TrapContext)
    mv a0, sp
    call trap_handler
感谢逐行的注释
从 csrrw sp, sscratch, sp可知这个函数执行时将从用户态转向内核态,此时在做用户栈到内核栈的转换,分配空间存储trapText,保存一些寄存器的值到内核栈上:比如x1,x3,x5~x31,t0(对应sstatus 寄存器,包含当前 CPU 的状态),t1(对应sepc 寄存器,包含trap发生时的程序计数器值),t2(对应与用户空间的sp),最后将sp的值赋给a0,传给trap_handler.总的来说就是在初始化处理trap的条件和特权转换
返回看os/trap/mod.rs之中的stvec::write(__alltraps as usize, TrapMode::Direct);这一行,将这个trap处理的程序地址写入stvec,控制trap处理代码的入口地址.也就是在trap::init();之后,我们可以调用stvec来处理所有的trap了
2.batch 这一小节的内容能和tutorial书中实现批处理系统这一节对应上.
pub fn init () { print_app_info (); } pub fn print_app_info () { APP_MANAGER.exclusive_access ().print_app_info (); } lazy_static! { static ref APP_MANAGER: UPSafeCell<AppManager> = unsafe { UPSafeCell::new ({ extern "C" { fn _num_app (); } let num_app_ptr = _num_app as usize as *const usize ; let num_app = num_app_ptr.read_volatile (); let mut app_start : [usize ; MAX_APP_NUM + 1 ] = [0 ; MAX_APP_NUM + 1 ]; let app_start_raw : &[usize ] = core::slice::from_raw_parts (num_app_ptr.add (1 ), num_app + 1 ); app_start[..=num_app].copy_from_slice (app_start_raw); AppManager { num_app, current_app: 0 , app_start, } }) }; }
先看这样一点代码.
这里调用的过程是init -> print__app_info -> APP_MANAGER 实例 -> lazy_static 初始化 -> print_app_info 方法。
下面是涉及到的rust语法
lazy_static: 给静态变量延迟赋值的宏,在第一次被访问时完成赋值
UPsafeCell: 在单处理器中使用的数据结构,里面包含一个RefCell<T>,通过.exclusive_access()可访问这个数据的可变引用,能防止内部对象被重复借用
os::ptr::read_volatile: pub unsafe fn read_volatile<T>(src: *const T) -> T,在保持内存不变的同时易失性地读取src的值
core::slice::from_raw_parts: pub const unsafe fn from_raw_parts<'a, T>(data: *const T, len: usize) -> &'a [T]根据指针和长度形成切片。len 参数是 元素 的数量,而不是字节数。
仔细看lazy_static的初始化内容:
声明了一个_num_app符号,在同级文件夹中的link_app.S中定义,这个文件在构建操作系统时,依据os/build.rs自动生成,内容类似下面:
_num_app:
    .quad 7
    .quad app_0_start
    .quad app_1_start
    .quad app_2_start
    .quad app_3_start
    .quad app_4_start
    .quad app_5_start
    .quad app_6_start
    .quad app_6_end

    .section .data
    .global app_0_start
    .global app_0_end
    app_0_start:
    .incbin "../user/build/bin/ch2b_bad_address.bin"
app_0_end:

    .section .data
    .global app_1_start
    .global app_1_end
由于const MAX_APP_NUM: usize=16,为指针切片app_start赋值时,将容纳小于此数的app个数,并将每个app的起始地址和最后一个app的结束地址存入切片
最后返回初始化成功的AppManager.这里的num_app的类型我有点不明白,因为对它赋值时,使用的是泛型也就是前一行的usize,然而存储0-16范围的数也需要统一使用usize吗?
调用print_app_info,依次输出app个数和每个app的内存地址
3.run_next_app 和上一小节同样在batch.rs之中,下面是来自tutorial的一段话
AppManager 的方法中, print_app_info/get_current_app/move_to_next_app 都相当简单直接,需要说明的是 load_app
pub fn run_next_app () -> ! { let mut app_manager = APP_MANAGER.exclusive_access (); let current_app = app_manager.get_current_app (); unsafe { app_manager.load_app (current_app); } app_manager.move_to_next_app (); drop (app_manager); extern "C" { fn __restore (cx_addr: usize ); } unsafe { __restore(KERNEL_STACK.push_context (TrapContext::app_init_context ( APP_BASE_ADDRESS, USER_STACK.get_sp (), )) as *const _ as usize ); } panic! ("Unreachable in batch::run_current_app!" ); } unsafe fn load_app (&self , app_id: usize ) { if app_id >= self .num_app { println! ("All applications completed!" ); use crate::board::QEMUExit; crate::board::QEMU_EXIT_HANDLE.exit_success (); } println! ("[kernel] Loading app_{}" , app_id); core::slice::from_raw_parts_mut (APP_BASE_ADDRESS as *mut u8 , APP_SIZE_LIMIT).fill (0 ); let app_src = core::slice::from_raw_parts ( self .app_start[app_id] as *const u8 , self .app_start[app_id + 1 ] - self .app_start[app_id], ); let app_dst = core::slice::from_raw_parts_mut (APP_BASE_ADDRESS as *mut u8 , app_src.len ()); app_dst.copy_from_slice (app_src); asm!("fence.i" ); }
load本身在需要载入应用程序时,先清空约定区域的内存,将应用的二进制文件载入,再清空缓存
整体来看,调用一个app的功能实现:
借来一个appManager的可变引用,方便调用它的impl
load 一个current 对应的app,再current+=1,drop掉appmanager
当我只看到这些时会觉得drop得有点早了,后面都在干什么?__restore的定义在哪里?找了一下在一个有点意外的位置:os/src/trap/trap.S
__restore:
    # case1: start running app by __restore
    # case2: back to U after handling trap
    mv sp, a0
    # now sp->kernel stack(after allocated), sscratch->user stack
    # restore sstatus/sepc
    ld t0, 32*8(sp)
    ld t1, 33*8(sp)
    ld t2, 2*8(sp)
    csrw sstatus, t0
    csrw sepc, t1
    csrw sscratch, t2
    # restore general-purpuse registers except sp/tp
    ld x1, 1*8(sp)
    ld x3, 3*8(sp)
    .set n, 5
    .rept 27
        LOAD_GP %n
        .set n, n+1
    .endr
    # release TrapContext on kernel stack
    addi sp, sp, 34*8
    # now sp->kernel stack, sscratch->user stack
    csrrw sp, sscratch, sp
    sret
a0塞进sp,以及几个熟悉的寄存器的出现,这个__restore和alltraps太像了,功能上和alltraps相反,是从内核态转到用户态用的.
在看一眼__restore被用去干嘛:
unsafe { __restore(KERNEL_STACK.push_context (TrapContext::app_init_context ( APP_BASE_ADDRESS, USER_STACK.get_sp (), )) as *const _ as usize ); } panic! ("Unreachable in batch::run_current_app!" );
功能解释:
TrapContext::app_init_context获取app起始地址和用户栈指针,用于创建TrapContext
KERNEL_STACK.push_context获取TrapContext本体,将它push进内核栈的栈顶,返回TrapContext的在内核栈中的可变引用
__restore读取TrapContext的数据并将 CPU 切换到用户模式同时恢复应用程序的状态.
在__restore后,程序就直接跳转到了应用程序的第一行二进制指令处,后面就暂时没有内核的事了.但是,应用结束任务再调用run_next_app的部分还没有看到,以及具体的应用出错的处理,特权转换也有点模糊(在我脑子里)
CodeReading-UserPart 1.__start 位于user/src/lib.rs中的函数,是用户库的入口函数,也是0x80400000地址对应的最先执行的程序部分。下面是tutorial里给的案例
1 #[no_mangle] 2 #[link_section = ".text.entry" ] 3 pub extern "C" fn _start () -> ! {4 clear_bss ();5 exit (main ());6 }
而我文件夹里的是这个样子:
#[no_mangle] #[link_section = ".text.entry" ] pub extern "C" fn _start (argc: usize , argv: usize ) -> ! { clear_bss (); unsafe { HEAP.lock () .init (HEAP_SPACE.as_ptr () as usize , USER_HEAP_SIZE); } let mut v : Vec <&'static str > = Vec ::new (); for i in 0 ..argc { let str_start = unsafe { ((argv + i * core::mem::size_of::<usize >()) as *const usize ).read_volatile () }; let len = (0usize ..) .find (|i| unsafe { ((str_start + *i) as *const u8 ).read_volatile () == 0 }) .unwrap (); v.push ( core::str ::from_utf8 (unsafe { core::slice::from_raw_parts (str_start as *const u8 , len) }) .unwrap (), ); } exit (main (argc, v.as_slice ())); }
多出的部分是在初始化堆、解析命令行参数(虽然现在应该没有应用需要)
后面exit之前进入了main函数,而因为pub extern "C" fn ,main不一定是同处于lib.rs的main,得根据实际链接时bin文件中的main符号对应的main函数来看,main之中的内容暂时不看
2.exit pub fn exit (exit_code: i32 ) -> ! { console::flush (); sys_exit (exit_code); }
上一节的_start最后调用了这个函数。这个函数内部的sys_exit是包装好的sys_call,实际上是ecall的汇编指令(类似第一章但是有区别)
ecall在用户态会触发Environment call from U-mode的异常,会把特权从U提到S,同时直接跳转到对应的处理程序.遗憾的是还是没有发现哪里会切换到下一个应用
3.User -> Supervisor 然而exit有所谓的exit_code,再顺藤摸瓜看看谁接收这个码,发现在os/src/syscall/process.rs中发现了以下神奇代码
use crate::batch::run_next_app;pub fn sys_exit (exit_code: i32 ) -> ! { trace!("[kernel] Application exited with code {}" , exit_code); run_next_app () }
那么问题来了,是谁调用了位于内核态的sys_exit?明明前面用户态调用的sys_exit是通过ecall实现的user/src/syscall.rs,这两个sys_exit是怎么最后联系在一起的?
再看看os/src/syscall/mod.rs
pub fn syscall (syscall_id: usize , args: [usize ; 3 ]) -> isize { match syscall_id { SYSCALL_WRITE => sys_write (args[0 ], args[1 ] as *const u8 , args[2 ]), SYSCALL_EXIT => sys_exit (args[0 ] as i32 ), _ => panic! ("Unsupported syscall_id: {}" , syscall_id), } }
可以看到syscall在内核态的包装方式,接下来在os的代码里找syscall
在os/src/trap/mod.rs中找到结果了
pub fn trap_handler (cx: &mut TrapContext) -> &mut TrapContext { let scause = scause::read (); let stval = stval::read (); match scause.cause () { Trap::Exception (Exception::UserEnvCall) => { cx.sepc += 4 ; cx.x[10 ] = syscall (cx.x[17 ], [cx.x[10 ], cx.x[11 ], cx.x[12 ]]) as usize ; } Trap::Exception (Exception::StoreFault) | Trap::Exception (Exception::StorePageFault) => { println! ("[kernel] PageFault in application, kernel killed it." ); run_next_app (); } Trap::Exception (Exception::IllegalInstruction) => { println! ("[kernel] IllegalInstruction in application, kernel killed it." ); run_next_app (); } _ => { panic! ( "Unsupported trap {:?}, stval = {:#x}!" , scause.cause (), stval ); } } cx }
这里发现调用了syscall
这个trap_handler就是每个应用的终点,不论是应用报错被alltraps接手,还是正常退出,从exit开始,最后都走到这里结束应用程序的生命周期.
整体和tutorial的内容算是一一对应,但是之前的rustlings没有这么多unsafe的指针操作和汇编,嗦实话这一章看的我好费劲T_T
rCore-ch3 这一章的任务是分时多任务系统。
分时多任务的情景之一就是在一个任务暂停运行(比如通过io设备打字输入)时切换其他任务执行,避免资源浪费。任务切换的情况和trap类似的地方在于上下文的保存,不同点在于不用特权转换。
先看看文档的内容:
reading guide 1.多程序放置加载 能够切换任务,说明程序都加载到内存里面了。在案例中,通过user/build.py达到为每个应用定制起始地址。(所谓的定制是指指定起始地址0x80400000再给每个应用0x20000的空间。)再通过loader和task(这两类似上章的batch)加载和切换任务。
#[no_mangle] pub fn rust_main () -> ! { clear_bss (); kernel_log_info (); heap_alloc::init_heap (); trap::init (); loader::load_apps (); trap::enable_timer_interrupt (); timer::set_next_trigger (); task::run_first_task (); panic! ("Unreachable in rust_main!" ); }
这是第三章的案例程序中内核的初始化过程,而loader在初始化时加载应用程序进内存。
2.任务切换
任务切换与上一章提及的 Trap 控制流切换相比,有如下异同:
与 Trap 切换不同,它不涉及特权级切换,部分由编译器完成;
与 Trap 切换相同,它对应用是透明的。
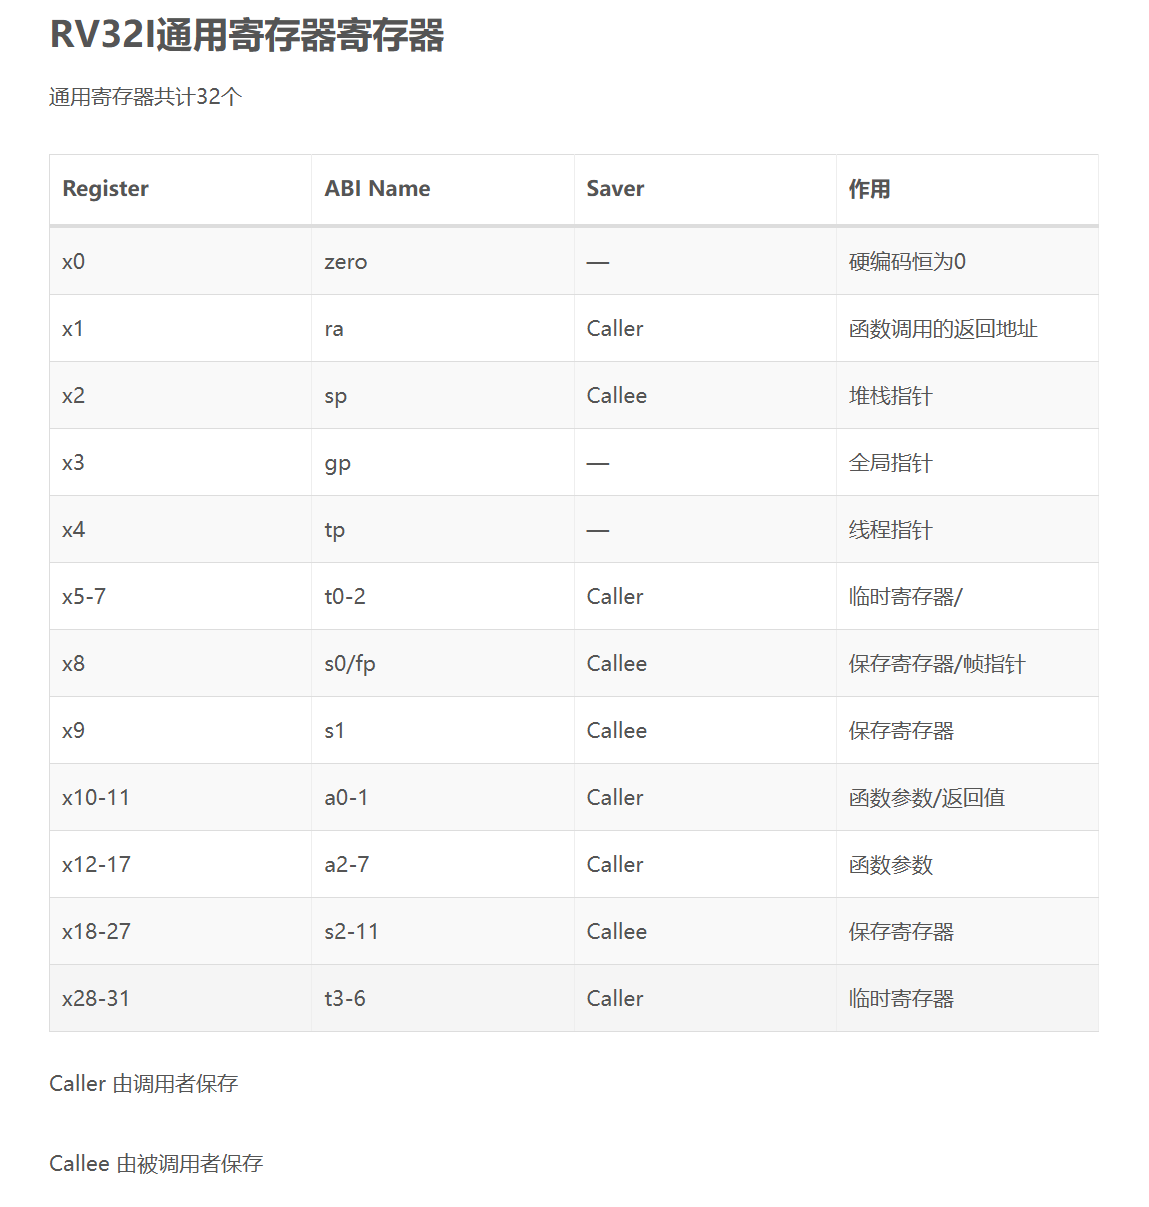
通过汇编的__switch函数实现保存转换任务上下文。上下文包括ra、sp、s0~11几个寄存器。传入__switch的参数通过a0和a1寄存器来传
(from internet)
函数调用过程中可以直接改写的寄存器叫临时寄存器(t0t6)。 在调用过程中不能直接改写的寄存器值得叫保存寄存器(s0s11),函数调用过程中如果要使用s0~s11,需要由被调用函数进行保护,保证在函数调用前后内部值不变。
类似地,俺把任务切换当成函数之间的unsafe跳转来理解。
为了安全调用__switch,于是把它解释为Rust函数。编译器自己帮我们保存和回复caller保存寄存器。这样完整的上下文得到保存。
3.管理多道程序
而内核为了管理任务,需要维护任务信息,相关内容包括:
任务运行状态:未初始化、准备执行、正在执行、已退出
任务控制块:维护任务状态和任务上下文
任务相关系统调用:程序主动暂停 sys_yield 和主动退出 sys_exit
代码挺多,细琐一下
1// os/src/task/task.rs
2
3#[derive(Copy, Clone, PartialEq)]
4pub enum TaskStatus {
5    UnInit, // 未初始化
6    Ready, // 准备运行
7    Running, // 正在运行
8    Exited, // 已退出
9}
原文给出的任务运行状态。
1// os/src/task/task.rs
2
3#[derive(Copy, Clone)]
4pub struct TaskControlBlock {
5    pub task_status: TaskStatus,
6    pub task_cx: TaskContext,
7}
以及任务控制块。(这个块就是内核中的应用管理单位)对其再封装一次:
// os/src/task/mod.rs

pub struct TaskManager {
    num_app: usize,
    inner: UPSafeCell<TaskManagerInner>,
}

struct TaskManagerInner {
    tasks: [TaskControlBlock; MAX_APP_NUM],
    current_task: usize,
}
对于UpSafeCell这个结构,在第二章的batch源码reading部分有解释,能防止内部对象被重复借用,出现于单处理器。这层层封装是为了常量和变量分离。
初始化时将每个任务块状态设为ready并在内核栈压入一些初始化上下文,再更新task_cx即可。切换任务时,调用sys_yield或者sys_exit。后者需要传入一个应用码以print出退出的应用。这两个功能上都会切换到下一个应用。而切换到下一个应用是通过__switch实现的。由于使用了UpSafeCell,在改变TaskManager.inner并使用完其中参数后需要立刻drop它
4.分时多任务
现代的任务调度算法基本都是抢占式的,它要求每个应用只能连续执行一段时间,然后内核就会将它强制性切换出去。 一般将 时间片 (Time Slice) 作为应用连续执行时长的度量单位,每个时间片可能在毫秒量级。 简单起见,我们使用 时间片轮转算法 (RR, Round-Robin) 来对应用进行调度。
挺神奇的一段话,信息量还挺足。这一节我恨不得全部cv,所以摸了,懒得写。
coding&reporting 
程序是通过了的,但是对于这个report有点疑问,就随便写了。
rCore-ch4 看看修改了些什么
 1├── os
 2│   ├── ...
 3│   └── src
 4│       ├── ...
 5│       ├── config.rs(修改:新增一些内存管理的相关配置)
 6│       ├── linker.ld(修改:将跳板页引入内存布局)
 7│       ├── loader.rs(修改:仅保留获取应用数量和数据的功能)
 8│       ├── main.rs(修改)
 9│       ├── mm(新增:内存管理的 mm 子模块)
10│       │   ├── address.rs(物理/虚拟 地址/页号的 Rust 抽象)
11│       │   ├── frame_allocator.rs(物理页帧分配器)
12│       │   ├── heap_allocator.rs(内核动态内存分配器)
13│       │   ├── memory_set.rs(引入地址空间 MemorySet 及逻辑段 MemoryArea 等)
14│       │   ├── mod.rs(定义了 mm 模块初始化方法 init)
15│       │   └── page_table.rs(多级页表抽象 PageTable 以及其他内容)
16│       ├── syscall
17│       │   ├── fs.rs(修改:基于地址空间的 sys_write 实现)
18│       │   ├── mod.rs
19│       │   └── process.rs
20│       ├── task
21│       │   ├── context.rs(修改:构造一个跳转到不同位置的初始任务上下文)
22│       │   ├── mod.rs(修改,详见文档)
23│       │   ├── switch.rs
24│       │   ├── switch.S
25│       │   └── task.rs(修改,详见文档)
26│       └── trap
27│           ├── context.rs(修改:在 Trap 上下文中加入了更多内容)
28│           ├── mod.rs(修改:基于地址空间修改了 Trap 机制,详见文档)
29│           └── trap.S(修改:基于地址空间修改了 Trap 上下文保存与恢复汇编代码)
30└── user
31    ├── build.py(编译时不再使用)
32    ├── ...
33    └── src
34        ├── linker.ld(修改:将所有应用放在各自地址空间中固定的位置)
35        └── ...
再来一点Rall的解释,没有这个这一章的代码会有点读不懂
RAII 是 resource acquisition is initialization 的缩写,意为“资源获取即初始化”。它是 C++ 之父 Bjarne Stroustrup 提出的设计理念,其核心是把资源和对象的生命周期绑定,对象创建获取资源,对象销毁释放资源。在 RAII 的指导下,C++ 把底层的资源管理问题提升到了对象生命周期管理的更高层次。
虚拟内存 1.页表及其工作机制 当直接访问内存时,访问方式是段基址+偏移。当需要读入的内存过大时,连续物理内存的不足将使这种行为失败。过小时也会无法进行换入换出。为了将线性的地址和物理地址解绑,页表应运而生。
对内存分页时,相等大小的页代替了不等的段。而页表则是对每一个虚拟内存的检索替换,它在保持偏移值的同时,将虚拟的连续 的段基址计算为不连续 的物理地址的段基址。
比如sv39多级页表。
2.sv39多级页表 首先,为了启用多级页表,需要修改 S 特权级的 satp CSR。
之后,MMU地址转换将所有的S/U特权级的访存地址视为VPN(virtual page number),并替换为PPN(physical page number)
sv39即指将VPN视为39个有效位的虚拟地址,转化为56位的ppn
VA:
[63..39]->与第38位相同,否则视为无效vpn
[38..12]->即VPN均分为三段,每段对应一级的页表查询
[11..0]->偏移值
PA:
[55..12]->即PPN,对应VPN的页表查询结果
具体的页表如图:
[0..7]->标志位:{
仅当 V(Valid) 位为 1 时,页表项才是合法的;
R/W/X 分别控制索引到这个页表项的对应虚拟页面是否允许读/写/取指;
U 控制索引到这个页表项的对应虚拟页面是否在 CPU 处于 U 特权级的情况下是否被允许访问;
G 我们不理会;
A(Accessed) 记录自从页表项上的这一位被清零之后,页表项的对应虚拟页面是否被访问过;
D(Dirty) 则记录自从页表项上的这一位被清零之后,页表项的对应虚拟页表是否被修改过。
}
[53..10]->页表存储的三段PPN
3.sv39 in Code 首先,代码里需要给定内存的可用部分。在os/src/config.rs中给定了内存的终止地址。pub const MEMORY_END: usize = 0x80800000;修改此地址可决定内存的大小。然后以0x80000000到MEMORY_END的区间传给FrameAllocator。
在实际运行时,需要对页帧进行分配和回收。
pub struct StackFrameAllocator { current: usize , end: usize , recycled: Vec <usize >, } impl StackFrameAllocator { pub fn init (&mut self , l: PhysPageNum, r: PhysPageNum) { self .current = l.0 ; self .end = r.0 ; } } impl FrameAllocator for StackFrameAllocator { fn new () -> Self { Self { current: 0 , end: 0 , recycled: Vec ::new (), } } fn alloc (&mut self ) -> Option <PhysPageNum> { if let Some (ppn) = self .recycled.pop () { Some (ppn.into ()) } else if self .current == self .end { None } else { self .current += 1 ; Some ((self .current - 1 ).into ()) } } fn dealloc (&mut self , ppn: PhysPageNum) { let ppn = ppn.0 ; if ppn >= self .current || self .recycled.iter ().any (|&v| v == ppn) { panic! ("Frame ppn={:#x} has not been allocated!" , ppn); } self .recycled.push (ppn); } }
可以看到对页帧分配的一些限制。如果成功就会直接返回Some(PPN)
但这个代码没有pub,说明需要在封装一层。由于页帧在多线程中运行的特殊性,FRAME_ALLOCATOR被UPsafecell封装一层,同一时间仅允许一个线程进行页帧分配。
pub fn frame_alloc () -> Option <FrameTracker> { FRAME_ALLOCATOR .exclusive_access () .alloc () .map (FrameTracker::new) } pub fn frame_dealloc (ppn: PhysPageNum) { FRAME_ALLOCATOR.exclusive_access ().dealloc (ppn); }
具体的页帧使用方式则需要看调用这两个接口的程序部分。不过实际上页表以外调用的地方只有如下函数:
pub fn map_one (&mut self , page_table: &mut PageTable, vpn: VirtPageNum) { let ppn : PhysPageNum; match self .map_type { MapType::Identical => { ppn = PhysPageNum (vpn.0 ); } MapType::Framed => { let frame = frame_alloc ().unwrap (); ppn = frame.ppn; self .data_frames.insert (vpn, frame); } } let pte_flags = PTEFlags::from_bits (self .map_perm.bits).unwrap (); page_table.map (vpn, ppn, pte_flags); }
页帧在页表中被封装存储
pub struct PageTable { root_ppn: PhysPageNum, frames: Vec <FrameTracker>, }
这里的FrameTracker即页帧,被基于rall原则的方法封装以保证它的生命周期
pub struct FrameTracker { pub ppn: PhysPageNum, } impl FrameTracker { pub fn new (ppn: PhysPageNum) -> Self { let bytes_array = ppn.get_bytes_array (); for i in bytes_array { *i = 0 ; } Self { ppn } } } impl Debug for FrameTracker { fn fmt (&self , f: &mut Formatter<'_ >) -> fmt::Result { f.write_fmt (format_args! ("FrameTracker:PPN={:#x}" , self .ppn.0 )) } } impl Drop for FrameTracker { fn drop (&mut self ) { frame_dealloc (self .ppn); } }
可以看到它只是ppn,只不过因为实现了一些trait比如drop,rust能够在其生命周期结束后被自动drop
回到页表,看看页表的方法们。虽然页表只有root_ppn和很多framed-tracker,但它的方法和pte关系很大(PageTableEntry)。比如find_pte_create,在映射了虚实内存之后按映射关系和页表公式取得pte,以及map,检验pte的有效与否
pub fn new () -> Self { let frame = frame_alloc ().unwrap (); PageTable { root_ppn: frame.ppn, frames: vec! [frame], } } pub fn from_token (satp: usize ) -> Self { Self { root_ppn: PhysPageNum::from (satp & ((1usize << 44 ) - 1 )), frames: Vec ::new (), } } fn find_pte_create (&mut self , vpn: VirtPageNum) -> Option <&mut PageTableEntry> { let idxs = vpn.indexes (); let mut ppn = self .root_ppn; let mut result : Option <&mut PageTableEntry> = None ; for (i, idx) in idxs.iter ().enumerate () { let pte = &mut ppn.get_pte_array ()[*idx]; if i == 2 { result = Some (pte); break ; } if !pte.is_valid () { let frame = frame_alloc ().unwrap (); *pte = PageTableEntry::new (frame.ppn, PTEFlags::V); self .frames.push (frame); } ppn = pte.ppn (); } result } fn find_pte (&self , vpn: VirtPageNum) -> Option <&mut PageTableEntry> { let idxs = vpn.indexes (); let mut ppn = self .root_ppn; let mut result : Option <&mut PageTableEntry> = None ; for (i, idx) in idxs.iter ().enumerate () { let pte = &mut ppn.get_pte_array ()[*idx]; if i == 2 { result = Some (pte); break ; } if !pte.is_valid () { return None ; } ppn = pte.ppn (); } result } #[allow(unused)] pub fn map (&mut self , vpn: VirtPageNum, ppn: PhysPageNum, flags: PTEFlags) { let pte = self .find_pte_create (vpn).unwrap (); assert! (!pte.is_valid (), "vpn {:?} is mapped before mapping" , vpn); *pte = PageTableEntry::new (ppn, flags | PTEFlags::V); } pub struct PageTableEntry { pub bits: usize , } impl PageTableEntry { pub fn new (ppn: PhysPageNum, flags: PTEFlags) -> Self { PageTableEntry { bits: ppn.0 << 10 | flags.bits as usize , } } pub fn empty () -> Self { PageTableEntry { bits: 0 } } pub fn ppn (&self ) -> PhysPageNum { (self .bits >> 10 & ((1usize << 44 ) - 1 )).into () } pub fn flags (&self ) -> PTEFlags { PTEFlags::from_bits (self .bits as u8 ).unwrap () } pub fn is_valid (&self ) -> bool { (self .flags () & PTEFlags::V) != PTEFlags::empty () } pub fn readable (&self ) -> bool { (self .flags () & PTEFlags::R) != PTEFlags::empty () } pub fn writable (&self ) -> bool { (self .flags () & PTEFlags::W) != PTEFlags::empty () } pub fn executable (&self ) -> bool { (self .flags () & PTEFlags::X) != PTEFlags::empty () } }
4.页表?页块! 上述只是页表的部分,页表和内存的映射这里开始
pub struct MapArea { vpn_range: VPNRange, data_frames: BTreeMap<VirtPageNum, FrameTracker>, map_type: MapType, map_perm: MapPermission, }
MapArea即逻辑段,意为一段连续(虚拟)地址的虚拟内存。其中包含的虚拟地址区间都是保证可以正确完成地址转换的,而且可读可写可执行(和物理地址功能上一致)。
其中的成员一一细说:
vpn_range:即虚拟区间,定义如下:
pub type VPNRange = SimpleRange<VirtPageNum>;pub struct SimpleRange <T>where T: StepByOne + Copy + PartialEq + PartialOrd + Debug , { l: T, r: T, } impl <T> SimpleRange<T>where T: StepByOne + Copy + PartialEq + PartialOrd + Debug , { pub fn new (start: T, end: T) -> Self { assert! (start <= end, "start {:?} > end {:?}!" , start, end); Self { l: start, r: end } } pub fn get_start (&self ) -> T { self .l } pub fn get_end (&self ) -> T { self .r } }
data_frames
map_type
其中 Identical 表示之前也有提到的恒等映射,用于在启用多级页表之后仍能够访问一个特定的物理地址指向的物理内存;而 Framed 则表示对于每个虚拟页面都需要映射到一个新分配的物理页帧。
当逻辑段采用 MapType::Framed 方式映射到物理内存的时候, data_frames 是一个保存了该逻辑段内的每个虚拟页面 和它被映射到的物理页帧 FrameTracker 的一个键值对容器 BTreeMap 中,这些物理页帧被用来存放实际内存数据而不是 作为多级页表中的中间节点。和之前的 PageTable 一样,这也用到了 RAII 的思想,将这些物理页帧的生命周期绑定到它所在的逻辑段 MapArea 下,当逻辑段被回收之后这些之前分配的物理页帧也会自动地同时被回收。
map_perm
那么这个映射虽然和vpn、ppn关系不小,但是没看到它怎么使用页表本身的代码。接下来是MemorySet,即地址空间。
地址空间 是一系列有关联的不一定连续的逻辑段,这种关联一般是指这些逻辑段组成的虚拟内存空间与一个运行的程序(目前把一个运行的程序称为任务,后续会称为进程)绑定,即这个运行的程序对代码和数据的直接访问范围限制在它关联的虚拟地址空间之内。
pub struct MemorySet { page_table: PageTable, areas: Vec <MapArea>, }
它的方法有new_bare、token、push、insert_framed_area、用于初始化的new_kernel、和from_elf
impl MemorySet { pub fn new_bare () -> Self { Self { page_table: PageTable::new (), areas: Vec ::new (), } } pub fn token (&self ) -> usize { self .page_table.token () } pub fn insert_framed_area ( &mut self , start_va: VirtAddr, end_va: VirtAddr, permission: MapPermission, ) { self .push ( MapArea::new (start_va, end_va, MapType::Framed, permission), None , ); } fn push (&mut self , mut map_area: MapArea, data: Option <&[u8 ]>) { map_area.map (&mut self .page_table); if let Some (data) = data { map_area.copy_data (&mut self .page_table, data); } self .areas.push (map_area); } fn map_trampoline (&mut self ) { self .page_table.map ( VirtAddr::from (TRAMPOLINE).into (), PhysAddr::from (strampoline as usize ).into (), PTEFlags::R | PTEFlags::X, ); } pub fn new_kernel () -> Self ; pub fn from_elf (elf_data: &[u8 ]) -> (Self , usize , usize );
push能够在当前的memory_set插入一个新的逻辑段,并为framed映射的页帧写入初始值,然后insert_framed_area调用push
注意该方法的调用者要保证同一地址空间内的任意两个逻辑段不能存在交集,从后面即将分别介绍的内核和应用的地址空间布局可以看出这一要求得到了保证;
真实地址空间初始化 当虚拟内存到物理内存的translate机制完善之后,我们可以尝试将所有的物理内存尝试以虚拟内存的方式初始化。
已知,内核代码的访存地址也是虚拟地址。则内核的各数据段访问也需要虚拟化。而这个过程还需要包含所有应用的内核栈以及跳板。
内核的四个逻辑段 .text/.rodata/.data/.bss 被恒等映射到物理内存,这使得我们在无需调整内核内存布局 os/src/linker.ld 的情况下就仍能象启用页表机制之前那样访问内核的各个段。注意我们借用页表机制对这些逻辑段的访问方式做出了限制,这都是为了在硬件的帮助下能够尽可能发现内核中的 bug ,在这里:
四个逻辑段的 U 标志位均未被设置,使得 CPU 只能在处于 S 特权级(或以上)时访问它们;
代码段 .text 不允许被修改;
只读数据段 .rodata 不允许被修改,也不允许从它上面取指执行;
.data/.bss 均允许被读写,但是不允许从它上面取指执行。
extern "C" { fn stext (); fn etext (); fn srodata (); fn erodata (); fn sdata (); fn edata (); fn sbss_with_stack (); fn ebss (); fn ekernel (); fn strampoline (); } impl MemorySet { pub fn new_kernel () -> Self { let mut memory_set = Self ::new_bare (); memory_set.map_trampoline (); println! (".text [{:#x}, {:#x})" , stext as usize , etext as usize ); println! (".rodata [{:#x}, {:#x})" , srodata as usize , erodata as usize ); println! (".data [{:#x}, {:#x})" , sdata as usize , edata as usize ); println! (".bss [{:#x}, {:#x})" , sbss_with_stack as usize , ebss as usize ); println! ("mapping .text section" ); memory_set.push (MapArea::new ( (stext as usize ).into (), (etext as usize ).into (), MapType::Identical, MapPermission::R | MapPermission::X, ), None ); println! ("mapping .rodata section" ); memory_set.push (MapArea::new ( (srodata as usize ).into (), (erodata as usize ).into (), MapType::Identical, MapPermission::R, ), None ); println! ("mapping .data section" ); memory_set.push (MapArea::new ( (sdata as usize ).into (), (edata as usize ).into (), MapType::Identical, MapPermission::R | MapPermission::W, ), None ); println! ("mapping .bss section" ); memory_set.push (MapArea::new ( (sbss_with_stack as usize ).into (), (ebss as usize ).into (), MapType::Identical, MapPermission::R | MapPermission::W, ), None ); println! ("mapping physical memory" ); memory_set.push (MapArea::new ( (ekernel as usize ).into (), MEMORY_END.into (), MapType::Identical, MapPermission::R | MapPermission::W, ), None ); memory_set } }
上面一串长不拉几的代码将在以下地方被使用:
lazy_static! { pub static ref KERNEL_SPACE: Arc<UPSafeCell<MemorySet>> = Arc::new (unsafe { UPSafeCell::new (MemorySet::new_kernel ()) }); }
也就是说,这个静态初始化就是内核空间的初始化实现。
类似的,也可以初始化应用的地址空间。
应用的地址空间
在前面的章节中,我们直接将丢弃所有符号的应用二进制镜像链接到内核,在初始化的时候 内核仅需将他们加载到正确的初始物理地址就能使它们正确执行。但本章中,我们希望效仿内核地址空间的设计,同样借助页表机制 使得应用地址空间的各个逻辑段也可以有不同的访问方式限制,这样可以提早检测出应用的错误并及时将其终止以最小化它对系统带来的 恶劣影响。
具体的说,之前的用户程序只是一个删去了符号等信息的bin文件,用很粗略的方法链接到对应空间里。而在虚拟内存的规范下,使用elf格式的应用已经是可行的。对应的代码修改有以下部分:
loader模块
linker脚本(用户态的那个)
elf格式的优势在于其格式规定的分段,每一段都有严格的权限限制,比如下面每一段的AX、AM等flag。
readelf -S user/target/riscv64gc-unknown-none-elf/release/ch2b_hello_world
.elf
There are 8 section headers, starting at offset 0x5170:

Section Headers:
  [Nr] Name              Type             Address           Offset
       Size              EntSize          Flags  Link  Info  Align
  [ 0]                   NULL             0000000000000000  00000000
       0000000000000000  0000000000000000           0     0     0
  [ 1] .text             PROGBITS         0000000000000000  00001000
       000000000000272c  0000000000000000  AX       0     0     2
  [ 2] .rodata           PROGBITS         0000000000003000  00004000
       0000000000000a60  0000000000000000  AM       0     0     8
  [ 3] .data             PROGBITS         0000000000004000  00005000
       00000000000000a8  0000000000000000  WA       0     0     8
  [ 4] .bss              NOBITS           00000000000040a8  000050a8
       0000000000004139  0000000000000000  WA       0     0     8
  [ 5] .comment          PROGBITS         0000000000000000  000050a8
       0000000000000048  0000000000000001  MS       0     0     1
  [ 6] .riscv.attributes RISCV_ATTRIBUTE  0000000000000000  000050f0
       000000000000003e  0000000000000000           0     0     1
  [ 7] .shstrtab         STRTAB           0000000000000000  0000512e
       000000000000003f  0000000000000000           0     0     1
Key to Flags:
  W (write), A (alloc), X (execute), M (merge), S (strings), I (info),
  L (link order), O (extra OS processing required), G (group), T (TLS),
  C (compressed), x (unknown), o (OS specific), E (exclude),
  D (mbind), p (processor specific)
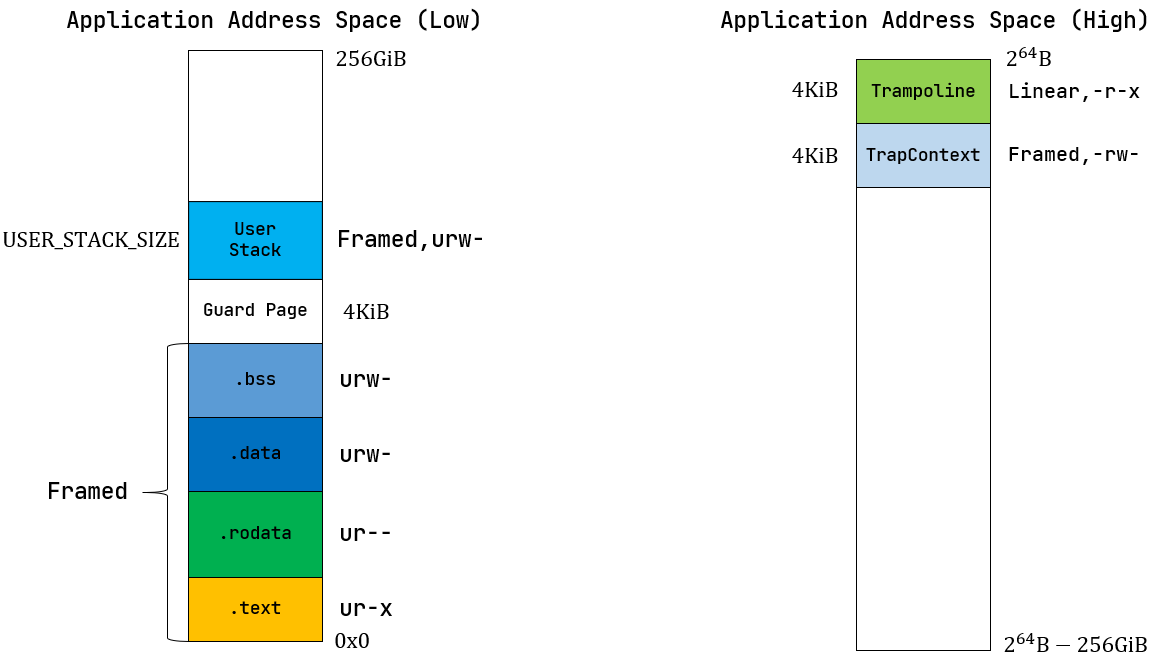
左侧给出了应用地址空间最低 256GiB 的布局:从 0x0 开始向高地址放置应用内存布局中的 各个逻辑段,最后放置带有一个保护页面的用户栈。这些逻辑段都是以 Framed 方式映射到物理内存的,从访问方式上来说都加上 了 U 标志位代表 CPU 可以在 U 特权级也就是执行应用代码的时候访问它们。
trap的变化 上一节的图中,trap被放在仅次于跳板的位置。看看mm的相关代码
pub fn from_elf (elf_data: &[u8 ]) -> (Self , usize , usize ) { let mut memory_set = Self ::new_bare (); memory_set.map_trampoline (); let elf = xmas_elf::ElfFile::new (elf_data).unwrap (); let elf_header = elf.header; let magic = elf_header.pt1.magic; assert_eq! (magic, [0x7f , 0x45 , 0x4c , 0x46 ], "invalid elf!" ); let ph_count = elf_header.pt2.ph_count (); let mut max_end_vpn = VirtPageNum (0 ); for i in 0 ..ph_count { let ph = elf.program_header (i).unwrap (); if ph.get_type ().unwrap () == xmas_elf::program::Type::Load { let start_va : VirtAddr = (ph.virtual_addr () as usize ).into (); let end_va : VirtAddr = ((ph.virtual_addr () + ph.mem_size ()) as usize ).into (); let mut map_perm = MapPermission::U; let ph_flags = ph.flags (); if ph_flags.is_read () { map_perm |= MapPermission::R; } if ph_flags.is_write () { map_perm |= MapPermission::W; } if ph_flags.is_execute () { map_perm |= MapPermission::X; } let map_area = MapArea::new (start_va, end_va, MapType::Framed, map_perm); max_end_vpn = map_area.vpn_range.get_end (); memory_set.push ( map_area, Some (&elf.input[ph.offset () as usize ..(ph.offset () + ph.file_size ()) as usize ]), ); } } let max_end_va : VirtAddr = max_end_vpn.into (); let mut user_stack_bottom : usize = max_end_va.into (); user_stack_bottom += PAGE_SIZE; let user_stack_top = user_stack_bottom + USER_STACK_SIZE; memory_set.push ( MapArea::new ( user_stack_bottom.into (), user_stack_top.into (), MapType::Framed, MapPermission::R | MapPermission::W | MapPermission::U, ), None , ); memory_set.push ( MapArea::new ( user_stack_top.into (), user_stack_top.into (), MapType::Framed, MapPermission::R | MapPermission::W | MapPermission::U, ), None , ); memory_set.push ( MapArea::new ( TRAP_CONTEXT_BASE.into (), TRAMPOLINE.into (), MapType::Framed, MapPermission::R | MapPermission::W, ), None , ); ( memory_set, user_stack_top, elf.header.pt2.entry_point () as usize , ) }
不明白为什么先塞跳板再检查elf的魔数。确认elf有效之后,该函数再遍历elf头(如果是load),对每一段的程序按照flag类型修改对应maparea的flag,最后将程序加载入虚拟空间中。之后是处理用户栈,最后是压入trap和跳板。


